

When Performance Max results change after you swap creative, it’s hard to know whether the creative was the reason. Google’s help center now documents A/B testing assets for Performance Max, which lets you compare two sets of assets side by side. This guide walks through how to set up your first test.
TL;DR
- Performance Max optimization experiments let you test a change to a Performance Max campaign before you commit to it.
- The type built for creative is called A/B testing assets, and it is currently labeled beta in Google Ads.
- You compare two sets of assets inside one campaign, pick a winning metric up front, and leave the test alone until it finishes.
What is it?
Asset Group Experiments allow advertisers to run split A/B tests on their creatives within Performance Max campaigns. You can split your campaign traffic between a Control arm (your existing assets) and a Treatment arm (your new headlines, descriptions, images, or videos) to see exactly which combination drives the best results.
Why was it introduced?
Historically, optimizing Performance Max campaigns felt like a black box. Updating an asset group meant overwriting live assets, making it incredibly difficult to isolate variables or definitively prove if a new design or copy tweak actually improved performance. Google introduced this feature to bring scientific rigor, transparency, and control back into the hands of media buyers.
How does it help advertisers?
- Risk-Free Creative Testing: Test bold new angles, seasonal promotions, or fresh video assets without risking your entire campaign’s live performance.
- Data-Driven Creative Strategy: Stop guessing which image or headline works. You get clear, statistically significant data showing which asset set wins on metrics like Cost per Conversion and CTR.
- Goodbye, Fatigue: Easily test fresh creatives to combat ad fatigue before your performance starts to dip.
- PMax vs. Feed-Only Clarity: E-commerce brands can finally run a clean test comparing a pure Merchant Center product feed against a fully loaded asset group (text, images, and video) to see the true ROI of their creative efforts.
The Bottom Line: Creative is the number one lever for scaling automated campaigns. With this rollout, you now have the exact framework needed to safely test, iterate, and optimize your way to better ROAS.
The problem it solves
Performance Max mixes your headlines, images, and videos automatically. When results change after you swap creative, other things are usually moving too: seasonality, budget, audience signals. An experiment gives you a controlled comparison so you can say the creative made the difference, instead of guessing.
What it checks
A creative test answers one question at a time. Examples:
- Is the asset group everyone assumes is the winner really the winner?
- Does a new set of images beat the set you’ve run for months?
- Does adding a video help an asset group that already performs?
- Does a promotional message do better than your everyday message?
Which campaign types can run experiments?
Each campaign type has its own set of tests.
| Campaign type | Experiments you can run | What they’re typically used for |
|---|---|---|
| Performance Max | Uplift, upgrade, and optimization experiments (A/B testing assets sits here) | Uplift: does Performance Max add results next to other campaigns? Upgrade: would it beat Standard Shopping, Dynamic Search Ads, or Display? Optimization: Final URL expansion and asset testing |
| Search | Custom experiments, ad variations, Maximize Conversion Value experiments | Smart Bidding, keyword match types, landing pages, audiences, ad groups, and ad text or responsive search ads |
| Display | Custom experiments | The same settings tests as Search, such as bidding, audiences, and landing pages |
Where A/B testing assets fits: it is one of the optimization experiments in the Performance Max row. It compares creative only, while the other Performance Max experiments test the campaign type or other features.
How to enable and set up an experiment
There is no separate switch to flip. The test appears on the Experiments page when it is available in your account. If you don’t see it, it may not have reached you yet.
The three groups of assets
Every asset in the asset group ends up in one of three buckets:
- Control (set A): your existing assets, used as the baseline.
- Treatment (set B): the assets you want to compare against the control.
- Common assets: anything you leave out of both arms. These keep serving to all traffic and aren’t part of the comparison.
Step 1: Start the experiment
- In Google Ads, open Experiments within the Campaigns menu.
- Click the plus button under the “All experiments” tab.
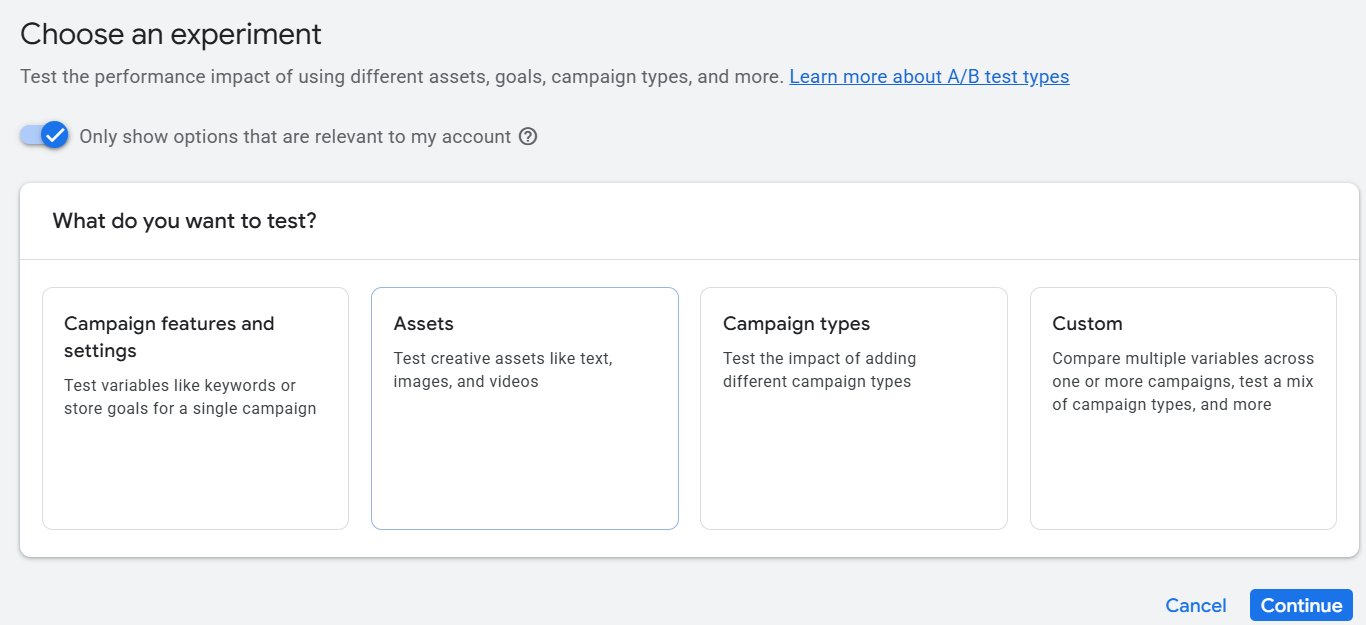
- Under “What do you want to test?”, select Assets.
- Under “Choose a variable to test,” select Assets provided by you.
- Select Performance Max as the campaign type and continue.
- Select Any assets as the experiment type.
- Choose the Performance Max campaign and the one asset group to test.
Step 2: Choose the campaign and asset group
Select the Performance Max campaign, then the one asset group you want to test. Only one asset group can be tested per experiment.
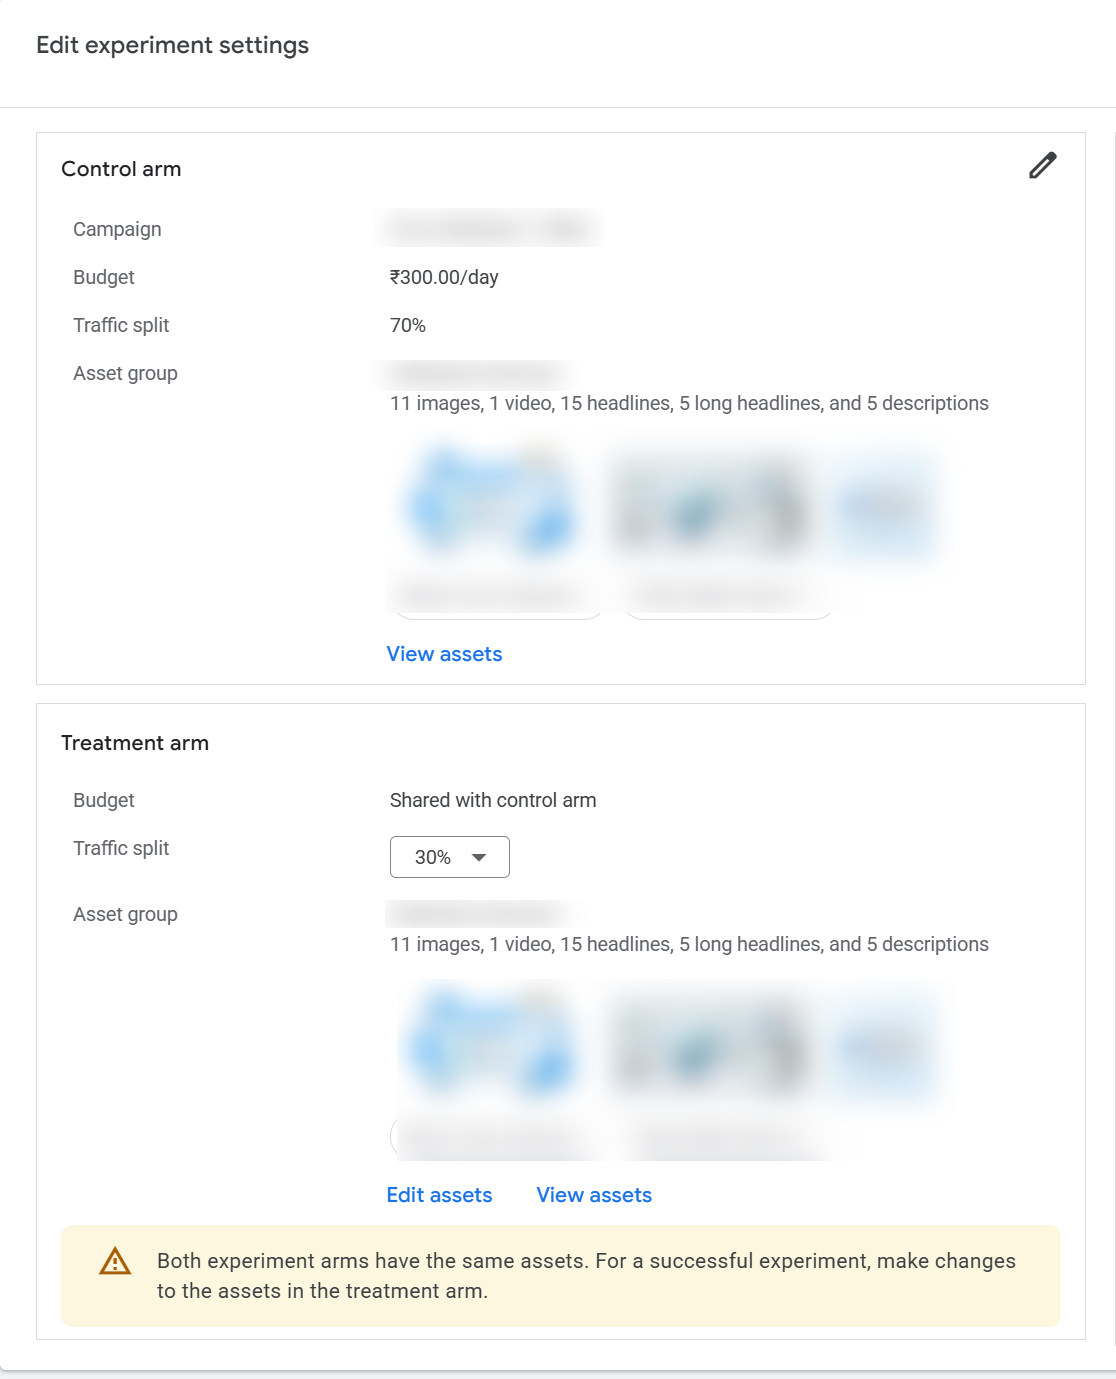
Step 3: Set up the control arm
The control arm is your baseline.
- Find the Control arm card and review the existing assets listed there.
- Check that they match what you consider “what we run today.”
- Don’t change them. Anything you don’t want in the comparison becomes a common asset.
Step 4: Set up the treatment arm
The treatment arm is your challenger.
- Find the Treatment arm card and select or upload the assets to test.
- Decide whether to add to the baseline, which tests whether more creative helps, or switch to an entirely new set, which tests a different direction.
- Keep the change focused. Test one idea at a time, such as new images or a new video.
Step 5: Set the traffic split
The split decides what share of traffic sees each arm.
- Enter a percentage for the Treatment arm and one for the Control arm gets automatically added to make it whole
More traffic on the control is a safer choice for an important campaign, though the result may take longer to be clear. This advice is practitioner guidance, not a Google rule. Decide before you schedule.
Step 6: Name it and set the dates
- Name: include the question, such as “Spring images vs current images.”
- Start date: set automatically to the next day.
- End date: Google’s guidance system suggests one based on how long the test likely needs. You can change it, but Google recommends running at least four to six weeks. Avoid starting right before a peak season.
Click Schedule to finish.
Step 7: While it runs
Once the experiment starts, you can’t edit, add, or remove assets in the tested asset group until it ends. The editing pages switch to view-only so the comparison stays valid. Leave it alone.
Step 8: When it ends
- Apply experiment: updates your asset group with the treatment assets. You choose whether to keep the control assets alongside them. Keeping them is the default.
- End experiment: stops the test with no changes. Treatment assets are discarded and the asset group goes back to how it was.
Then record the result and what you’ll test next.
Check these before you create it
- A shared budget, a portfolio bidding strategy, or Smart Bidding Exploration on the campaign can stop the experiment from being created. Remove them first.
- Make sure every asset meets Google’s policies.
- Decide your success metric before you launch, not after you see the results.
Getting started
- Write one question. “Does creative set B beat set A?” is a good test. “Which creative is best?” is too broad.
- Choose one success metric that matches the campaign’s goal, such as conversion value or conversions.
- Change one thing. If you change images, headlines, and videos together, you won’t know which change mattered.
- Check that the account is ready. Confirm the campaign meets the conditions above and has enough conversions to read a result.
- Launch and leave it alone. Don’t edit the tested assets while it runs.
- Give it time. Performance Max needs a settling period after any change, so plan for several weeks and avoid starting right before a peak season.
- Read the result. Apply the winner, note what you learned, and choose the next test.
Limits to keep in mind
- One asset group per experiment, and tested assets are locked until it ends.
- The result shows which set won, not why. Treat your explanation as a hypothesis for the next test.
- It’s a beta feature, so menus can change. Check the Experiments page for what’s currently offered.
- For teams: before launch, write down the question, success metric, start date, and end date. Keep one shared log across accounts so nobody launches changes in the middle of someone else’s test.
Related Links:



Stop the wasted ad spend. Get more conversions from the same ad budget.
Our customers save over $16 Million per year on Google and Amazon Ads.