Changing bidding strategy, refreshing ad copy, or tweaking targeting can have a huge impact — positive or negative. Instead of guessing, Google Ads Experiments let you test changes in a controlled way by splitting traffic between your current campaign (the base campaign) and a modified version (the experiment).
Over the years, Google has simplified the Experiments feature — removing the old Draft-and-Experiment workflow, adding Performance Max experiments, and improving reporting. This guide combines insights from our earlier posts and the latest 2025 updates to help you get the most from Experiments.
What Are Google Ads Experiments?
- A campaign experiment allows you to run a variation (or multiple variations) of a campaign in parallel with the original (base) campaign, using a portion of the base campaign’s traffic and budget.
- You can compare performance metrics (clicks, conversions, cost, ROAS, impression metrics, etc.) between experiment and base to decide whether the change is fruitful
- In the current interface, Google has removed the explicit “Drafts → Experiment” workflow: you now directly create experiments from original campaigns in the Experiments interface.
- Google now supports experiments for Performance Max campaign types (to test uplift, feature toggles, etc.), in addition to the more “traditional” experiments (custom experiments, ad variation, video experiments)
Why & When to Create Experiments
You should create an experiment whenever you want proof that a change works before risking your live campaign’s performance.
Step-by-Step: How to Create & Run an Experiment (Updated Workflow)
Below is a recommended process (with some “legacy” ideas from older Karooya posts, but adapted to current best practice).
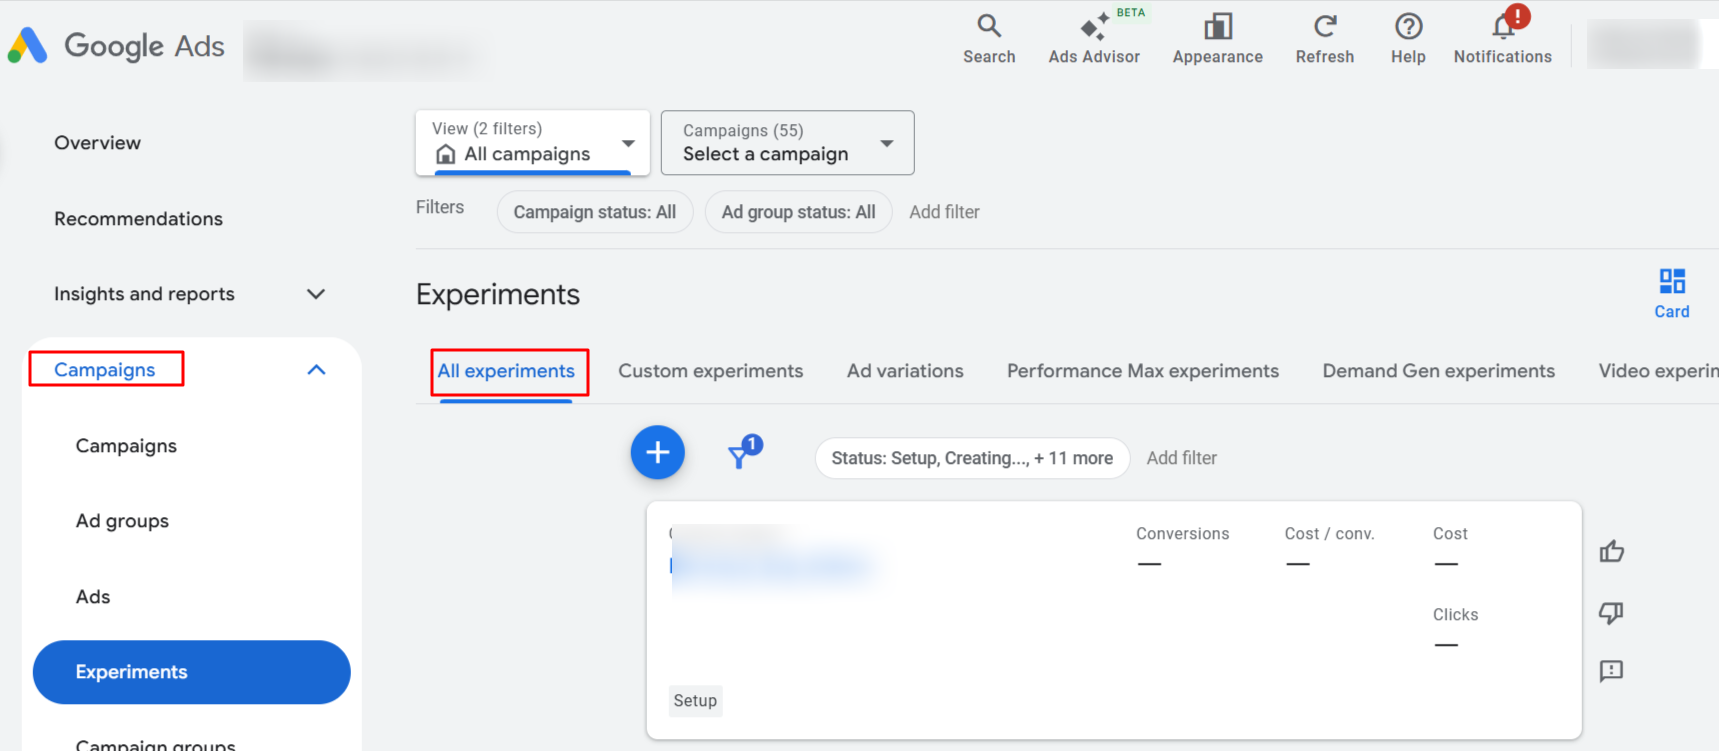
1. Navigate to the Experiments Interface
- In your Google Ads account, click Campaigns → then the “Experiments / All Experiments” menu.
- The “All Experiments” page shows your existing experiments, their status, and metrics.
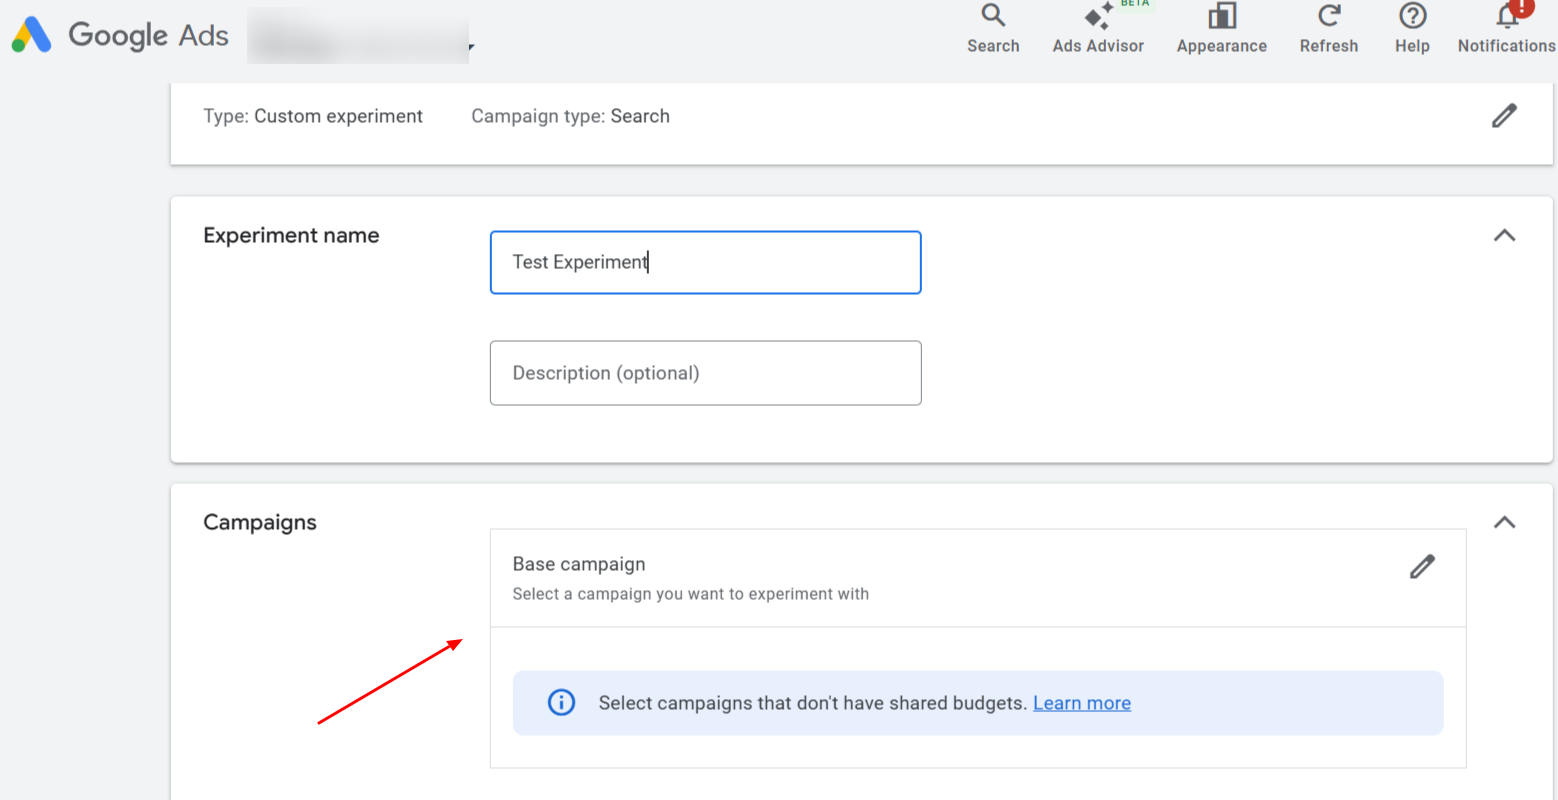
2. Create a New Experiment
- Click the “+” / “Create experiment” button on the All Experiments page.
- Choose the experiment type (Custom, Ad Variation, Video, Performance Max, etc.) based on what you want to test.
| Experiment Type | Focus | Campaigns Supported | Best Use Case |
|---|---|---|---|
| Custom Experiments | Full-campaign changes | Search, Display, Video, Hotel | Bidding, landing pages, audiences, budget tests |
| Ad Variations | Creative (ad copy) | Search, Display | Headlines, descriptions, CTAs |
| Video Experiments | Video creative testing | YouTube / Video campaigns | Comparing video styles, messaging, CTAs |
| Performance Max Experiments | PMax uplift & settings | Performance Max | Incremental lift, new asset groups or goals |
| One-Click Target ROAS | Bidding test (Shopping) | Standard Shopping | Switching to Smart Bidding (Target ROAS) |
NOTE : In this post, we will take you through the steps of setting up Custom Experiments. That process is used when you want to test things like:
- Bidding strategy changes (Manual CPC → Target CPA / ROAS / Max Conversions)
- Landing page variations
- Audience changes (adding/excluding remarketing or in-market lists)
- Keyword or match-type adjustments
- Ad schedule / geo / device targeting
- Budget allocation tests
Basically, it’s the full-campaign experiment type where you duplicate a campaign and make any strategic change you want. Other experiment types (Ad Variations, Video Experiments, PMax uplift) have their own, usually shorter workflows.
- Ad Variations skip the base-campaign cloning step — you only enter new ad text and Google rotates it.
- Video Experiments and PMax Experiments have tailored setup screens.
The detailed steps shown below describe the Custom Experiment workflow — the most flexible and most often used for testing major changes.
3. Select Base Campaign & Configure
- Pick the original (base) campaign to test against. The experiment will derive from this campaign.
- Immediately apply the changes you want to test in the experiment version (not in the base).
- Example changes: switch bidding strategy, modify landing page, add or remove audiences, change keyword match types, etc.
- Note constraints:
- The base campaign should not use a shared budget.
- Depreciated ad types (like old Expanded Text Ads) may need removal before experiment creation.
- If there’s an existing experiment overlapping in timeframe, you can’t run a second one.
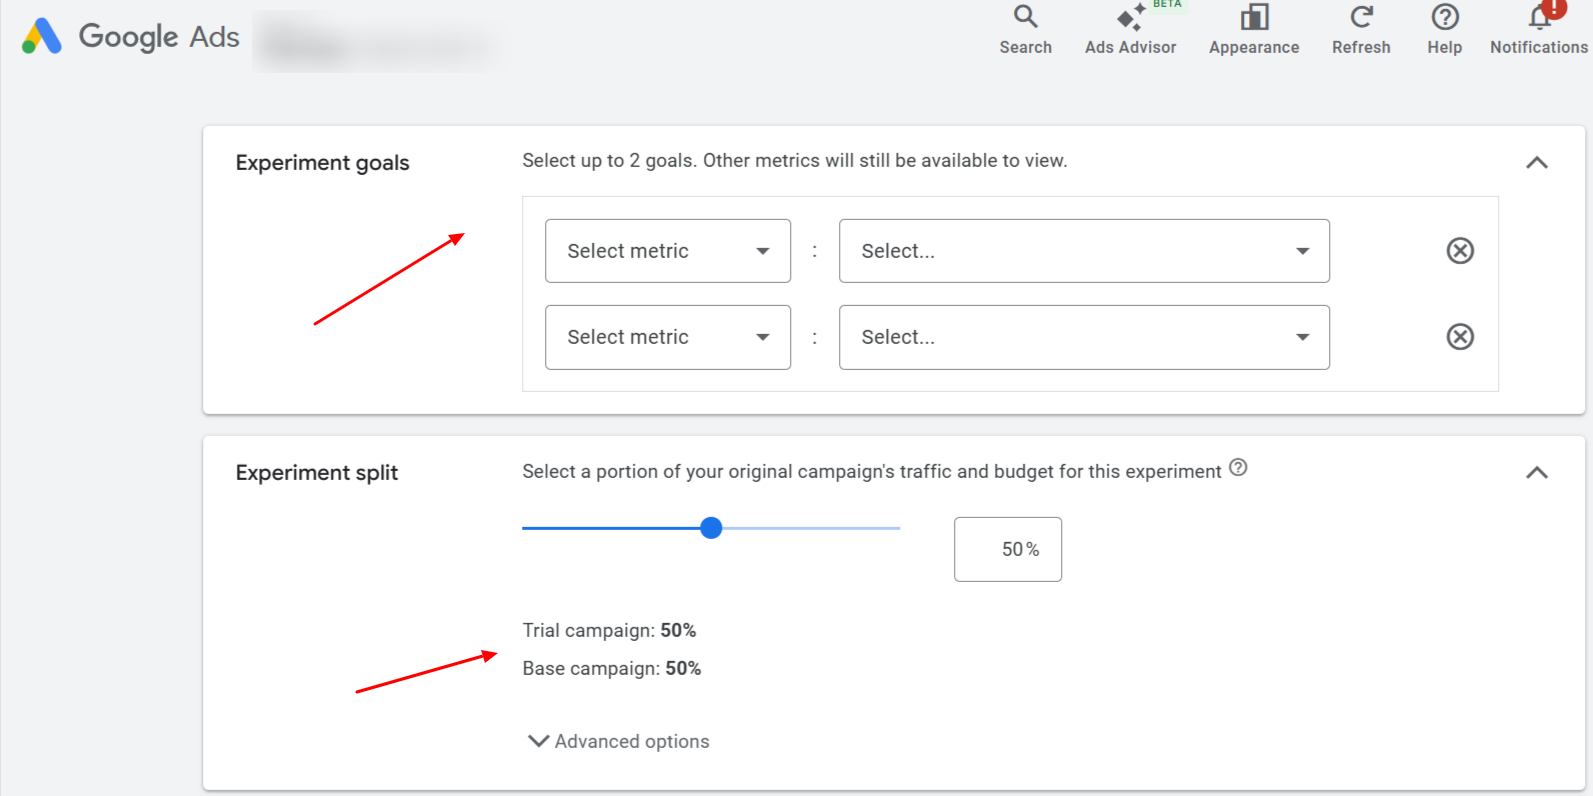
4. Define Split & Goals
- Decide what proportion of budget/traffic is allocated to the experiment (e.g. 50/50, or more conservative like 80/20).
- Advanced options:
• Cookie-based split: assigns users once so they always see either base or experiment.
• Search-based split: each search may be randomly assigned to base or experiment (users could see both). - Select the objective metric(s). Google lets you choose up to two metrics but all metrics are still reported. Select goals that align with the specific change you’re testing. For example:
- If you’re testing Target CPA bidding, focus on Cost-per-Conversion and Conversions.
- If testing a new ad copy, focus on CTR and Conversions.
- For a geo-expansion, focus on Conversions and Impression Share.
5. Schedule the Experiment
- Set a start date (often next day) and optionally an end date.
- Because ad review can cause delays, many recommend scheduling experiments to start in the future so reviews don’t disrupt setup.
6. Apply the Variation(s)
- Once created, modify the experiment campaign(s): change bidding settings, target audiences, landing pages, and/or ad copy as per your hypothesis.
- If using ad variation experiment, you can apply minor copy changes (find & replace, URL updates).
7. Enable Sync (Optional)
- Google offers a “sync” option to auto-propagate certain changes from the base campaign (e.g. paused keywords, negative keywords) into the experiment, avoiding drift.
- Use sync carefully; avoid syncing changes that you’re actively testing (because that would confound results).
8. Launch & Monitor
- Launch the experiment. Monitor performance via the Experiments table and custom reports.
- Key statuses to watch: In Progress, Undecided, Winner declared, etc.
- Let it run for sufficient time (Google suggests 4–6 weeks for some experiments to accrue meaningful data) before deciding.
9. Decide & Apply / Close
- If the experiment “wins,” you can apply the experiment to the original campaign (i.e. push the changes) or convert the experiment into a standalone campaign.
- If the experiment is inconclusive or underperforms, you can end it (stop early) or let it expire.
Best Practices, Common Pitfalls & Things to Watch Out For
Here are critical tips and caveats drawn from both Karooya’s older advice and more recent community experience:
- Don’t test trivial changes
Tiny tweaks (e.g. swapping one word in a description) may not generate significant signal. Focus on changes with meaningful potential impact. (Many guides echo this) - Sufficient sample size & duration
Running too short (e.g. <2 weeks) may yield misleading results. Some experiments may need 4–6 weeks. - Avoid overlapping experiments
You can only run one experiment per base campaign at a time. - Watch “cannibalization” effects
Sometimes the experiment version may take most of the traffic/impressions, making the base look weak (distorting comparison). Some advertisers raise this as concern. - Disconnect between difference and percentage columns
In some account views, a small absolute difference in cost per conversion might show a large percentage difference (if base number was small). This can confuse interpretation. (Seen on forums) - Historic learning & legacy signal
When an experiment becomes the winner and is applied, the learnings and historic data from the experiment carry over, so it doesn’t “start from scratch.” - Be cautious with sync and auto-changes
Syncing changes or making edits to base can break the purity of the test. Use auto-sync only for non-tested settings. - Limit experiment reactivation
Experiments with end dates cannot be reactivated. Once ended, to test again you may need to create a fresh experiment. (This was a “quirk” historically)
Google Ads Experiments — Scenarios & What to Test
Below is a full list of scenarios and what you can test.
| Scenario | What You Can Test |
|---|---|
| 1. Switching Bidding Strategies | Manual CPC → Max Conversions / Target CPA / Target ROAS; Smart vs. Manual bidding; seasonal bid changes |
| 2. Testing New Ad Copy / Creatives | Headlines, descriptions, CTAs, promotional messaging, video ad creatives for YouTube |
| 3. Landing Page Variations | New vs. existing landing pages, different layouts, offers, page speed impact on conversions |
| 4. Audience Targeting Adjustments | Adding or excluding in-market, affinity, remarketing audiences; bid adjustments for audience layers |
| 5. Keyword & Match Type Changes | Broad vs. Phrase match; adding/removing keywords; pausing low-performing keywords |
| 6. Budget Allocation Tests | Increasing/decreasing daily budgets; shifting budget between campaigns; testing seasonal budget boosts |
| 7. Ad Schedule / Dayparting | Restricting ads to high-performing hours/days; expanding schedule to capture more conversions |
| 8. Geographic Targeting | Adding new cities/regions/countries; narrowing down to top-performing geos |
| 9. Device Bid Adjustments | Prioritizing mobile vs. desktop; testing mobile-only or adjusting bids by device |
| 10. Testing New Campaign Types | Search vs. Performance Max; Standard Shopping vs. Smart Shopping; Display vs. Video remarketing |
| 11. Ad Extensions / Assets | Adding sitelinks, price extensions, images; rotating or removing underperforming assets |
| 12. Shopping Campaign Optimizations | Switching Standard Shopping to Target ROAS; testing Smart Bidding within Shopping campaigns |
| 13. Seasonal / Event-Based Promotions | Limited-time discounts, free shipping messages, festive ad creatives |
| 14. Bid Modifier Adjustments | Adjusting bids for remarketing lists, demographics, or location-based modifiers |
| 15. Performance Max Feature Tests (2025) | Uplift tests vs. existing campaigns; testing new asset group structures, goals, or audience signals |
Final Thoughts
Google Ads Custom Experiments give advertisers the power to make changes confidently — testing bidding strategies, landing pages, audiences, and other key elements without risking the performance of the entire campaign.
In this post, we focused on Custom Experiments because they’re the most versatile and commonly used for strategic testing. Coming up in future posts, we’ll dive deeper into the other types of experiments — including Ad Variations, Video Experiments, and Performance Max uplift tests — to help you choose the right experiment type for each scenario.
By adopting a culture of experimentation, you’ll make smarter, data-backed decisions and continuously improve campaign performance.
FAQ: Making the Most of Google Ads Experiments
Q1. Can I run more than one experiment at a time in Google Ads?
A: You can, but avoid testing multiple experiments that overlap the same campaign or share budget and targeting. Running them in parallel can cause data contamination. Instead, queue tests sequentially or isolate them by campaign to maintain clean comparisons.
Q2. What metrics should I prioritize when analyzing an experiment?
A: Focus on the goal your experiment was designed for — such as conversion rate, ROAS, or CPA. Secondary metrics like CTR or impression share can add context but shouldn’t decide the winner unless they directly support your main objective.
Q3. Are there limits to the number of experiments I can run per account?
A: Each campaign can have one experiment at a time, but an account can have multiple experiments as long as they don’t overlap resources or settings. Performance Max and Smart campaigns have additional restrictions depending on experiment type.
Q4. Can experiments affect learning phases of smart bidding strategies?
A: Yes, when testing bid strategies like Target ROAS or CPA, Google’s learning phase restarts in the experiment. It’s normal for performance to fluctuate initially—give the experiment enough time for the algorithm to stabilize before judging results.
Q5. Do experiments impact my campaign’s historical performance data?
A: No. Data from the experiment stays separate from the base campaign’s history until you apply the results. Once applied, the changes move into your main campaign, and performance history continues from that point onward.
Q6. How can I use experiments to optimize Performance Max campaigns?
A: For PMax, use the Performance Max Experiment type in the Experiments tab. You can test creative assets, budgets, or conversion goals. Ensure each variation has enough conversion volume, and measure results based on incremental conversion uplift rather than CTR or CPC.
Q7. Can I test audience segments or demographics in experiments?
A: Absolutely. You can create experiments that isolate new audience segments, custom intent lists, or demographic groups. This helps understand which groups respond best to your ads without permanently altering your targeting.
Q8. What’s the best way to communicate experiment results to clients or stakeholders?
A: Use Google Ads’ built-in comparison view or export data to a dashboard (Google Looker Studio or Sheets). Highlight your hypothesis, the change tested, statistical confidence, and key performance metrics. Visual summaries improve clarity and decision-making.


Stop the wasted ad spend. Get more conversions from the same ad budget.
Our customers save over $16 Million per year on Google and Amazon Ads.